AUD Flash Crash: A Trading Case Study
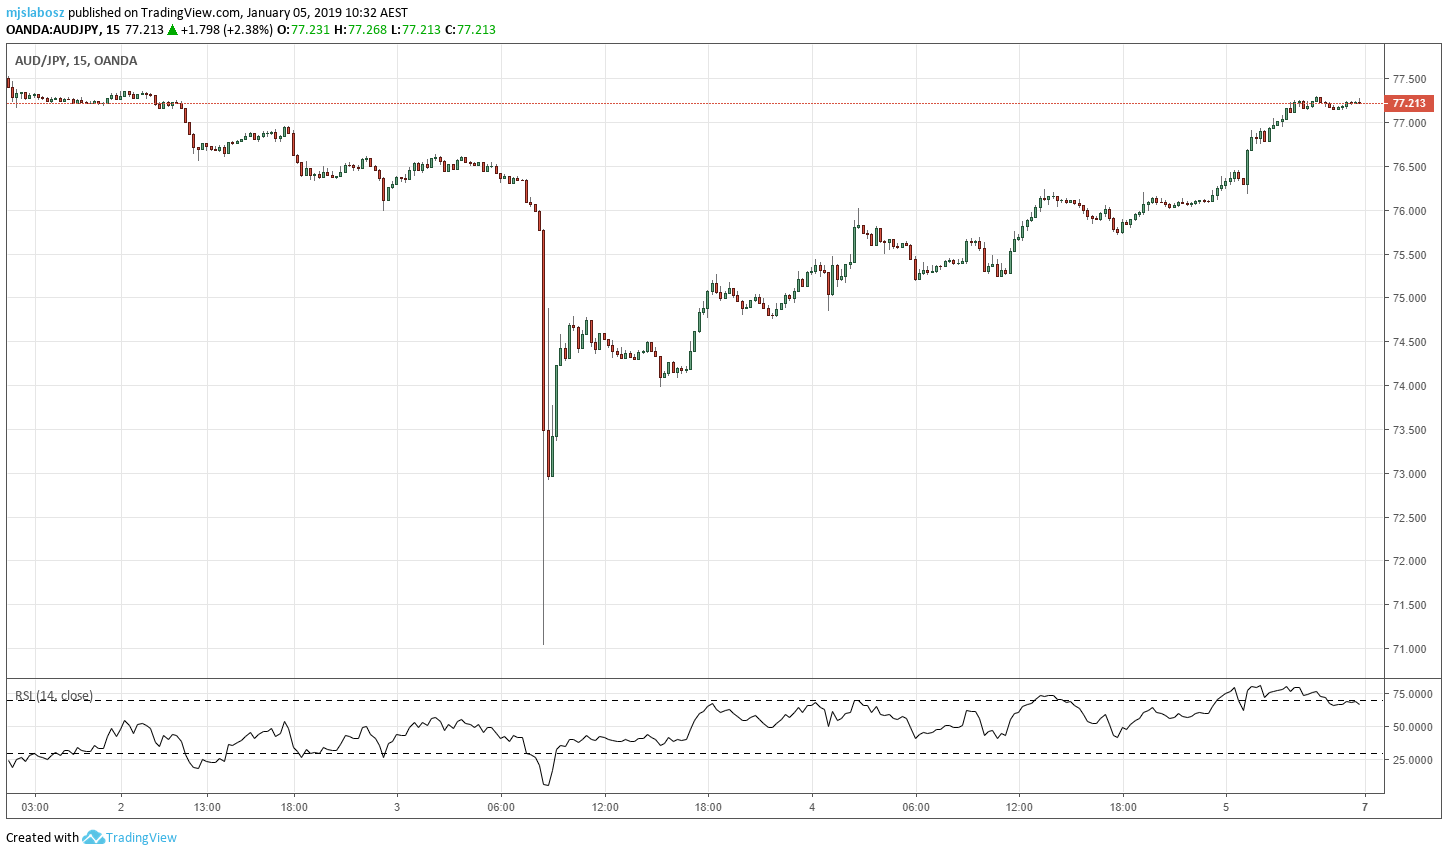
Table of Contents
What Caused the AUD/JPY Flash Crash?
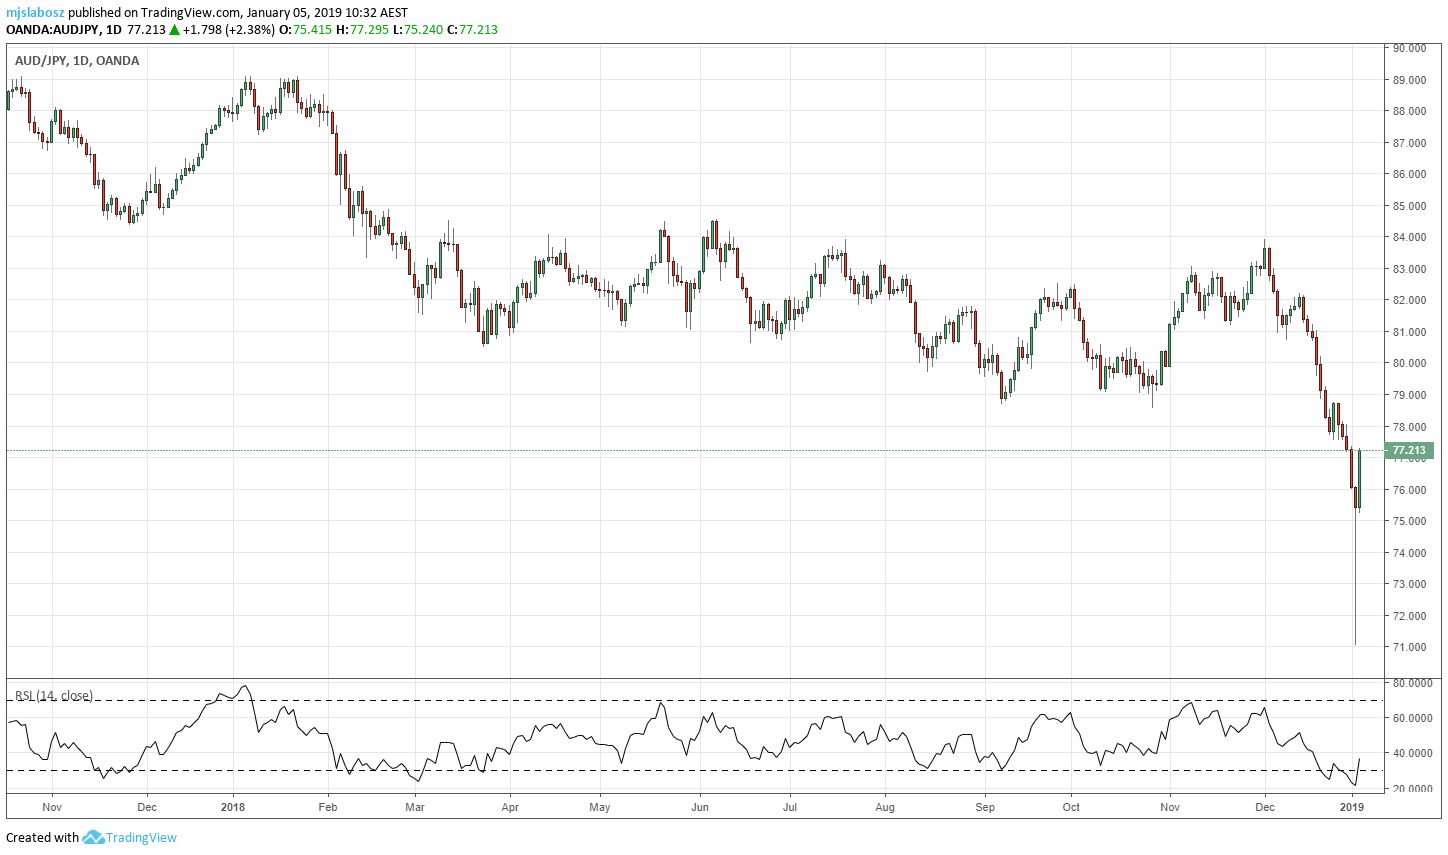
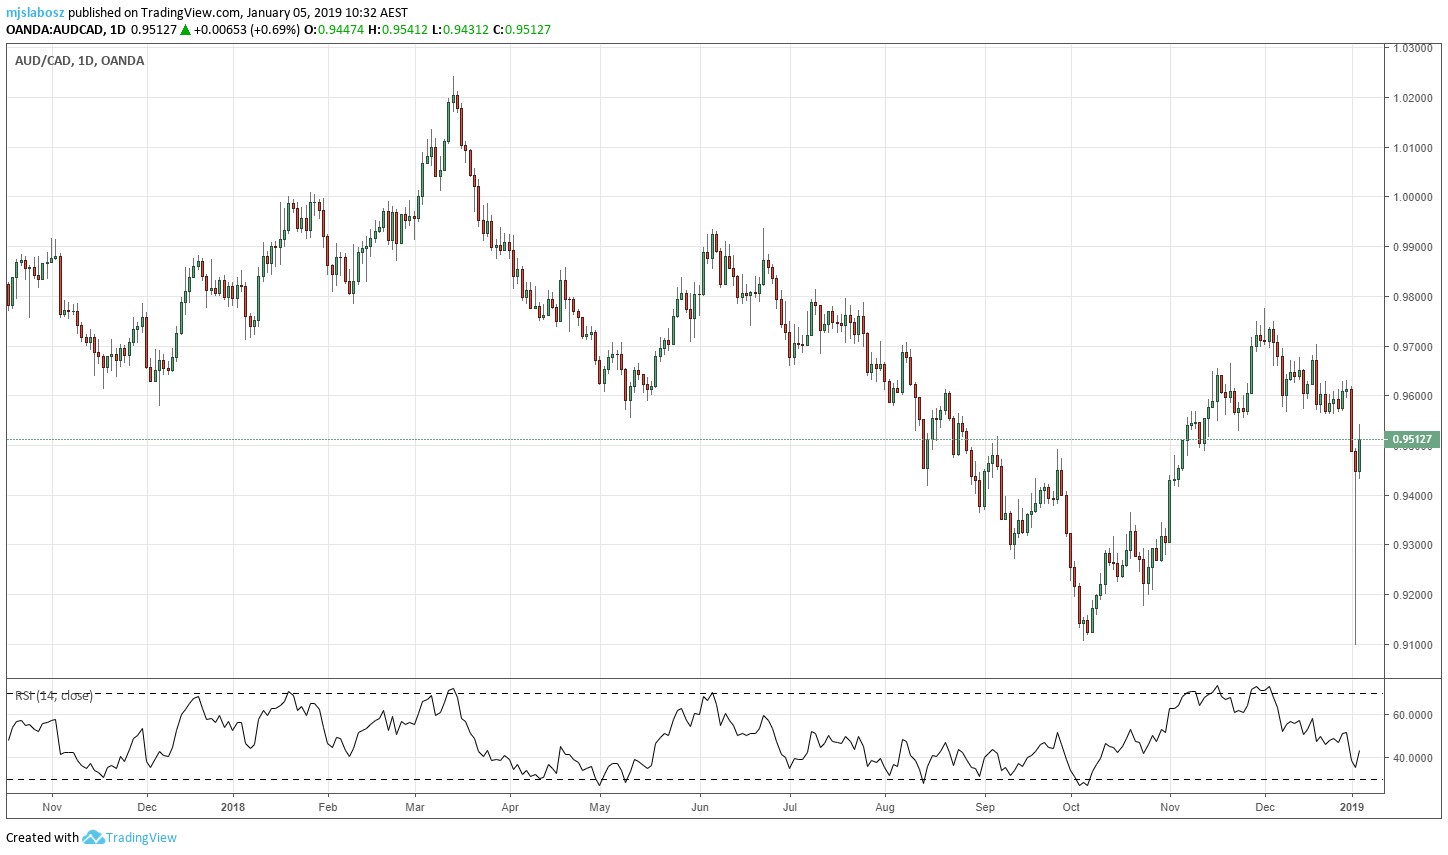
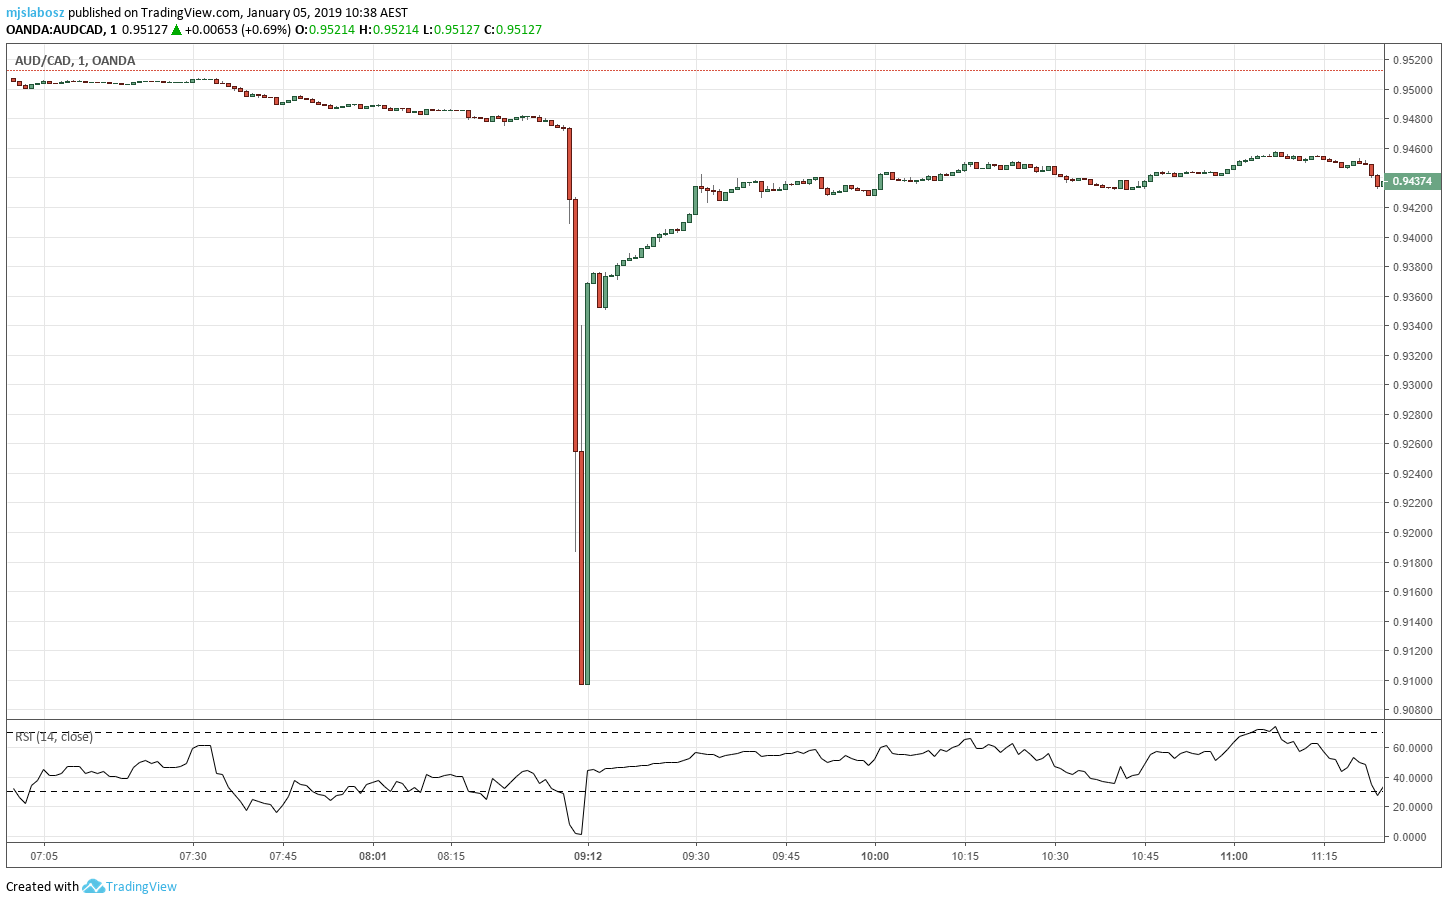
AUD flash-crashed against all of its pairs on Thursday morning, January 3rd 2019.
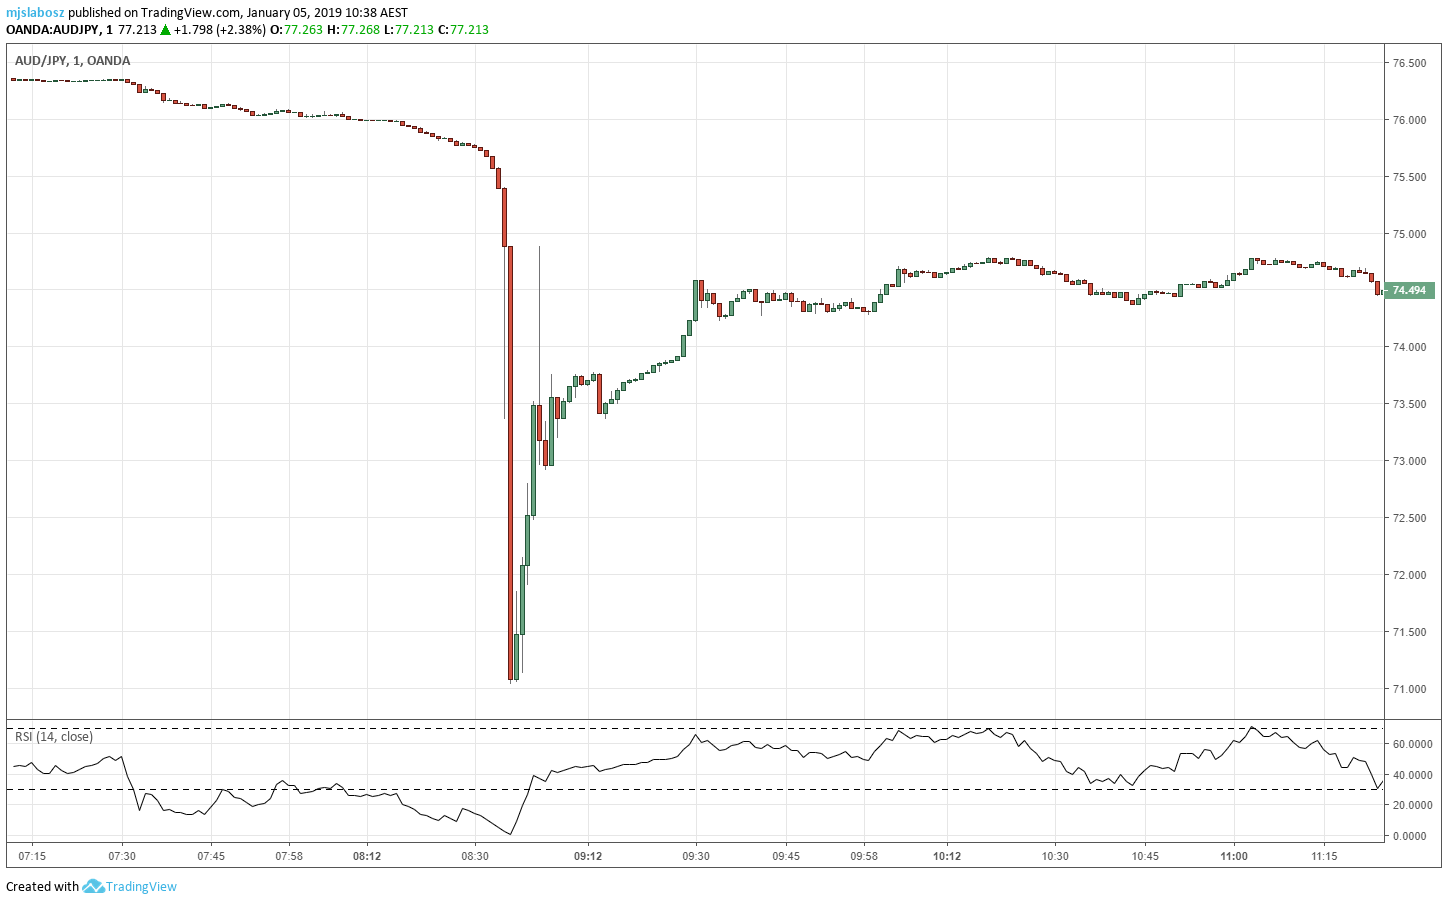
AUD/JPY was the major pair that was hit the hardest, reaching a 6.5% decline in a matter of minutes – which is the forex equivalent of a natural disaster.
The most compelling theory hitting the wires is that this crash was caused by a large JPY buy order (and/or AUD sell order) following Apple downgrading their profit forecasts significantly as a result of the ongoing US/China trade war, which triggered a reactionary robot selling frenzy an hour later as the algos gobbled up all the safe-haven Yen they could buy.
Of course, this is all speculation as forex is a notoriously opaque market. But given that prices fell several hundred pips in less than five minutes, this theory is worthy of consideration.
The Apple downgrade obviously spooked some human investors, but apparently it really spooked the big-money algorithms that were in control of the market at that time. They are the only ones capable of causing such mayhem in such a short period of time.
As this all occurred around the time of the Australian market open – which is one of the lowest points of liquidity in the forex trading day – and being a holiday period where most large trading firms are on holiday, there was simply not enough buy-side liquidity to absorb the massive sell orders that flooded the market.
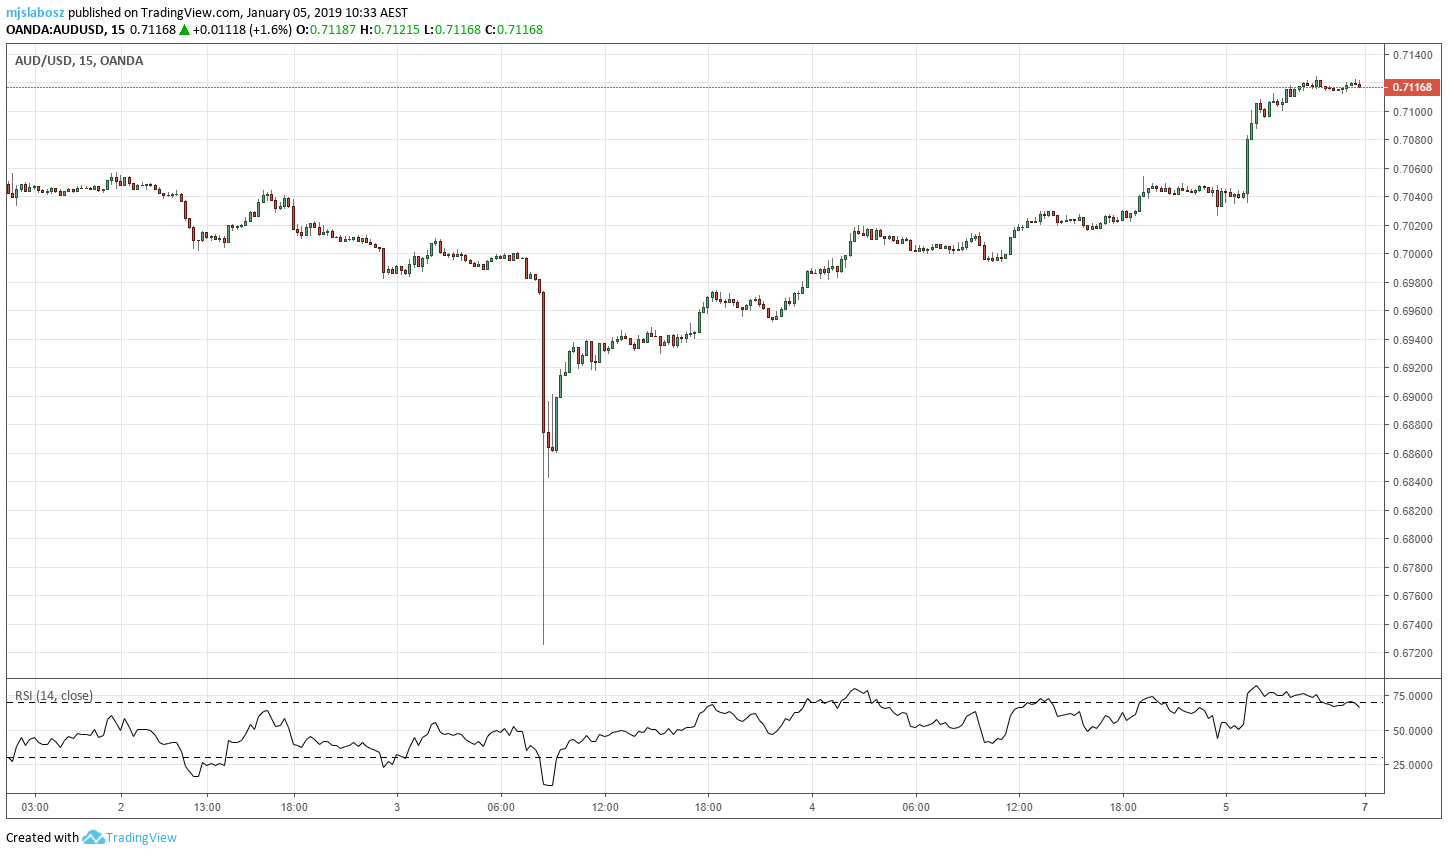
The fact that USD/JPY only fell 3.5% while AUD/JPY fell 6.5% suggests that these algos were buying JPY heavily, while at the same time, selling AUD heavily.
As the algorithms began to sell AUD and buy JPY, prices fell so quickly and ferociously through a thin market that it triggered cascading buy limits and stop-loss orders, over and over again, until the last of them were hit and the most extreme buy orders were triggered.
The few people who had resting buy orders miles below the market are very happy this week, let me tell you.
But interesting theories aside, there are several very real lessons to be drawn from this experience.
Crisis Breeds Opportunity
The first thing to note here is that this currency crisis was a huge opportunity for some traders.
Given that there was significant evidence to suggest that this was an algo-driven flash crash, this implied that the move that occurred on all the AUD and JPY pairs that morning was extraordinarily over-done, and essentially “accidental” price action.
It was a massive, massive overreaction to what amounts to expected bearish news in a currently bearish market.
The fact that no other market was affected to this extent, including S&P 500 and NASDAQ futures, implies that this was a contained incident that only affected the Yen and Aussie dollar – further supporting the theory that this was a cascading algo flash-crash, and not George Soros dumping several billion Aussie dollars all at once.
Therefore, the conclusion to draw was pretty straightforward: buy the Aussie dollar.
In terms of the path of least resistance, which price usually prefers to take after an event like that, the easiest way to go was back up. So the odds were significantly in favor of the bulls, at least for the next few days. There were huge incentives for bulls to push the price back, and very little incentive for central banks to allow the currency to stay so dramatically undervalued for no good reason.
In fact, the move down was so massive and the initial rebound so swift, that I was quickly convinced that AUD would retrace the entire move and perhaps even over-shoot its starting point as the bulls regained control.
And you can bet your bottom dollar that there were a number of professional traders who made a hell of a lot of money riding this clusterfuck of an algo mistake back up to its point of origin. Over the next two days, prices indeed retraced the entire move.
AUD/JPY ended the week up at 77.213, which is about 150 pips above the average price during the hours leading up to the flash crash – and an astonishing 620-pip climb in two days.
Crisis Breeds Danger
Despite being a huge opportunity to make money, this crisis was also an opportunity to lose a lot of money. Anyone who was long AUD/JPY without a stop loss got slaughtered this week. Even those who were long with a stop loss probably got burned by slippage.
I personally had a small short position open on EUR/AUD on my discretionary account at the time. It got wicked out, because AUD’s huge drop against Yen and the other majors sent Euro skyrocketing against AUD.
When I saw that the trade had lost, I was worried that I might’ve been slammed by slippage. But to my surprise, the account was fine, and I only took the small loss that I was prepared to take.
I don’t know if this would have been different if I’d had a larger position open or if I’d been long AUD/JPY instead of short EUR/AUD, or if Oanda’s systems just handled the situation well.
Oanda are renowned for having bad spreads during volatile times even during highly liquid trading sessions, so I am nothing short of amazed that this move didn’t damage my discretionary account much worse.
In any case, another major lesson from this event is that it is important not to be complacent when trading. Especially when using leverage, especially when trading forex, especially during illiquid sessions.
Forex markets are not our game. This is the bankers’ game, and they will do whatever they want whenever they want, and we are caught in their wake like the small fish we are.
If we do not have a plan for dealing with and preparing for these kinds of events, then not only are we robbing ourselves of a rare opportunity to make fast “easy” money, we are also setting ourselves up for pain.
Have A Plan for Black Swan Events
I made some money trading this recovery, but I should have made a hell of a lot more.
I was too conservative as this was my first time trading a forex flash crash, and I wasn’t sure that the market wouldn’t do something else crazy and wipe me out. With the moves that were happening, it would’ve been easy to blow up an account as a result of what would normally be considered minor mistakes.
Despite my concerns, I decided to trade it anyway.
Trading the recovery on the lower timeframes felt like what I can only imagine surfers must feel when they surf a giant wave. It was nerve-wracking, but extremely exciting, and it required intense focus not to come undone.
At one point I made 33% on my discretionary account in fifteen minutes with a large scalp position on AUD/JPY, only to discover that if I had just rolled my stop loss to break even and let the trade go overnight, I could’ve made over 150% – all from about 3% worth of initial risk.
When you consider that the S&P500’s average yearly return over a 90-year period is 10%, that sort of gain over a short timeframe is phenomenal. These are the kinds of moves that can make your career if you know what you are doing.
I have printed out all of the charts from this event so that I can study them from time to time. I want to vividly remember what it looks like to see a market crash to insanely low valuations only to rapidly recover within hours.
This event actually reminds me of the day of my initial exposure to cryptocurrencies. I recall the first time I saw the chart of Ethereum’s flash crash to $13 and thinking to myself, “The people who bought up the bottom of that crash just made the easiest money of their lives.”
This was yet another situation like that.
If you had been long with stop loss orders that got hit by large slippage, then that is a catastrophic stroke of bad luck (or bad decision-making if you did not have a stop).
But if you did not have a position, and you were waiting on the sidelines for a chance to enter at a good price, and you happened to be at the right place at the right time… then moments like these present truly miraculous opportunities.
But only if you have the training, the courage and the discipline to execute on them properly.
Great Traders Adapt
During this crash, I was technically on a trading break.
I have not been trading my rules-based systematic strategy since Christmas week (although I did take two very small discretionary trades on EUR/AUD and Silver), so I was not fully involved with the markets when this happened. Ironically, I ignored an AUD/JPY trend-continuation short setup earlier in the week because I expected it to be a quiet period with little activity.
But when I woke up that day and turned on my charts and saw what had happened, I began to think about the situation and what I might be able to do with it. I knew this was an extremely rare occurrence, and that if I did not take advantage of it somehow I would regret it.
While I ate breakfast and pondered the charts and my options, I told my old man about the move. His immediate reply was this:
I do not particularly enjoy lower-timeframe discretionary trading (as I am usually terrible at it since I am inexperienced at day-trading), but during such a situation, I knew it was time to disregard my strict systematic trading plan and trade what the market was giving me. All I had to do was focus, be disciplined and patient, and hunt for good risk-reward opportunities.
Having such a strong conviction that the markets would recover this move, and witnessing the price action confirm my idea, I had to act on it – at least on a discretionary account.
In hindsight I actually regret not being more aggressive, as the opportunity proved even better than I’d hoped. The market did not look back once it began to recover.
The 1-minute chart was behaving like the 15-minute chart usually would in a strong breakout between Daily levels, so the magnitude of the intraday moves were a day-trader’s dream.
It was pretty clear to me that algos were still mostly in control as the markets bounced between even-handled numbers like textbook setups.
I was not afraid of them this time, since I figured once a catastrophic event like that happens in the markets, it is unlikely that it will occur again so soon after, since you would assume that whoever caused it would turn off their machines for a postmortem.
So it was a great time to ride the recovery by following the algos’ actions on the 1-minute and 5-minute charts. Whenever price held a key moving average or a key intraday level, I would take a large position.
I did make a few mistakes that cost me a heap of profit along the way, such as stupidly trying to short AUD/JPY repeatedly at one point, thinking it was too over-bought. A classic mistake, and another hard lesson.
But in the end, I wound up with around a 60% gain on the discretionary account over two days.
I am very happy with that result given how little I risked, although I absolutely could have done a lot better, which is why I am taking the time to dissect this event for future reference.
One Good Trade
As Mike Bellafiore from SMB Capital says, your job as a trader is to make one good trade, then one good trade, then one good trade.
He defines a good trade like this:
Trade Thesis + Setup in your Playbook + Confirmation on the Tape + Fight for Price = One Good Trade.
In a situation like the AUD flash crash, you can build a great trade by following this formula.
Trade Thesis:
Algos crashed the market during a period of low liquidity, pushing prices well out of the realm of “fair value”.
This was not caused by a shock fundamental change in global market outlook, and the Australian economy is not in a sudden and unexpected crisis.
Therefore it is fair to assume that the price of the Australian dollar will retrace most or all of this “accidental” move.
Setup in your Playbook:
As there are very few precedents of this type of black swan event, it is difficult to develop a strategy around it. Therefore, during times of extreme market abnormality, discretion and intuition is your best tool.
If things look too ugly to make sense of it, stay out.
But if circumstances begin to look like they present an opportunity, then use your training as a trader to take advantage of the opportunity and do your best with what you have (while managing your risk accordingly).
This could mean, as in my case, buying whenever price holds key moving averages that have acted as support in the recent past, or buying when key intraday levels show that they are holding, or simply buying breakouts of consolidation patterns. I used all three of these methods to good effects while maintaining tight stops.
Due to the volatility of the spread, I did not use hard stops but watched how price behaved and closed trades based on my discretion. This is where having the utmost discipline in position sizing and stop loss execution is paramount.
You need to decide before you open a position where you want to exit (both for a profit or a loss), otherwise you will talk yourself into holding on to a bomb.
Profit-taking is a little more difficult. As I mentioned earlier, I suffocated my profits on these trades. I should have made 10 times the amount of money I made this week. But I was unprepared, I was in holiday mode, I wasn’t expecting to have to trade that move, and that cost me a lot of money.
If there is a next time, then as a result of this reflection, I will know exactly what to do.
Confirmation on the Tape:
As retail forex traders, we do not get as much tape information as prop traders do with stocks. We don’t get to see what size or quantity of orders are going through outside of our own brokers.
But price never lies. If price cannot break and hold below an obvious key intraday support level after repeated attempts, or it breaks through it and then recovers it and holds for a while, then chances are that during a time like this, price really wants to move higher.
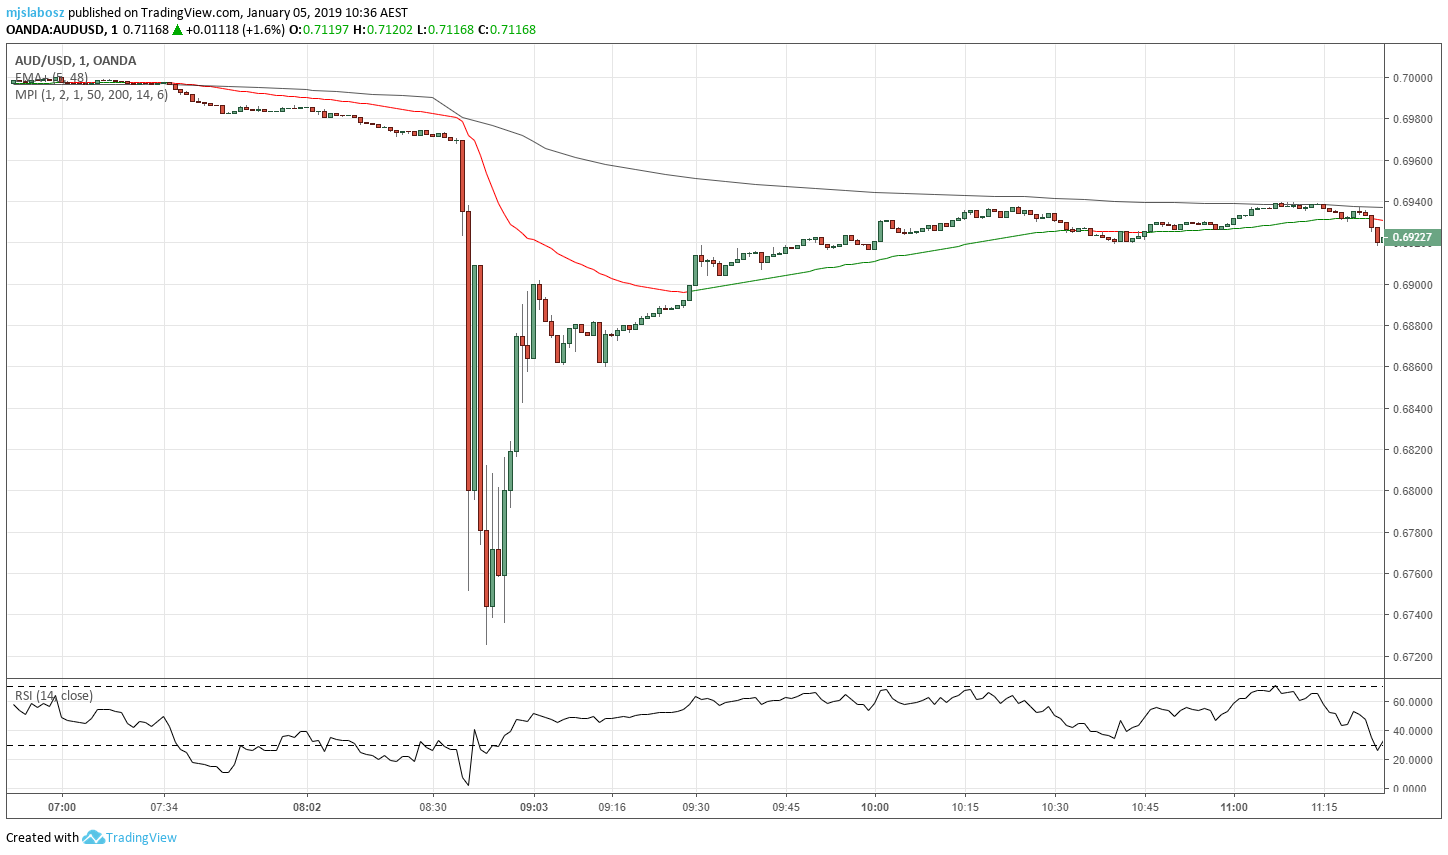
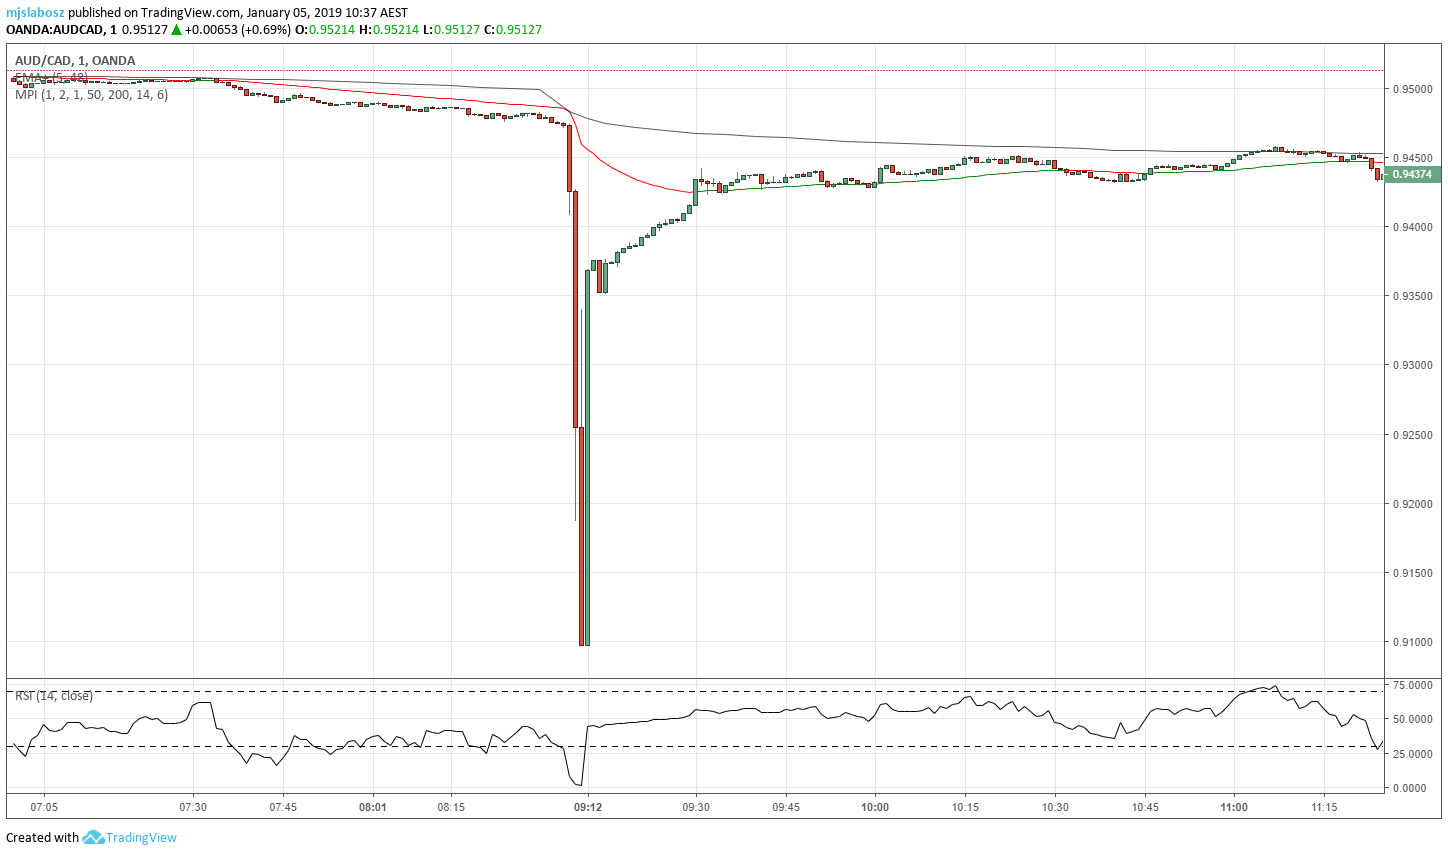
My favorite setups to play during this time was a test of a higher timeframe 50-period Exponential Moving Average and tests of the 1-minute 50EMA. Whenever price showed strength at these zones, I was ready to pounce.
I made my two of my biggest trades on tests of the 5-minute 50EMA and the 1-hour 50EMA (entering and managing on the 1-minute chart). The reason why I think this was effective is because trading algos seemed to be the ones moving the price, and they tend to use indicators such as EMAs for trade execution.
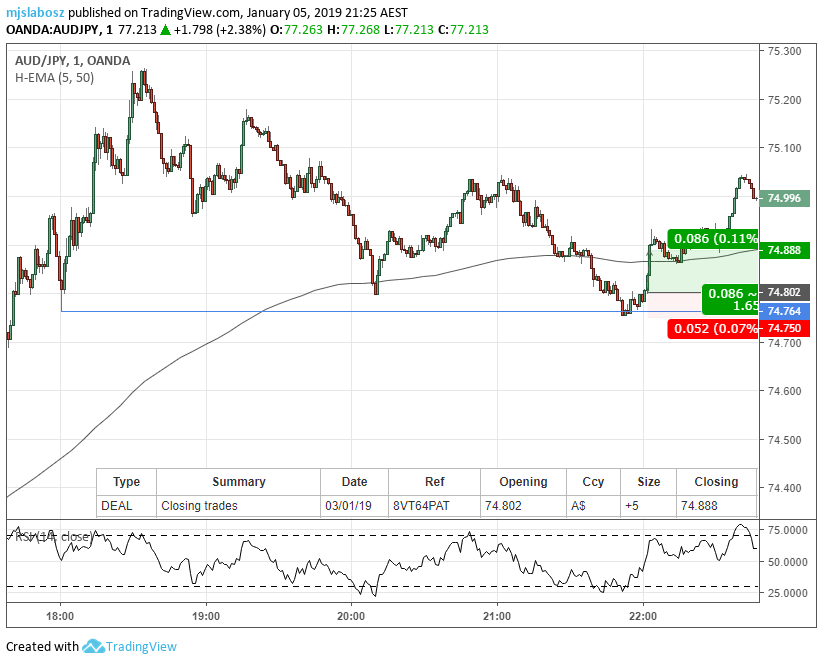
I caught a very nice 15% gain within an hour or so when AUD/JPY tested the 1-hour 50EMA while forming a 1HR bullish flag consolidation pattern. I bought it up with a tight stop on the 1-minute chart when a higher low formed, and targeted an even-handle number for my exit. It played out like a charm.
Normally this would be a terrible strategy, but during a time like this I knew momentum was abnormally strong and that buyers would be looking for any reason to buy this thing back up to Daily resistance, which was well over a few hundred pips away.
So whenever it showed strength on a key technical indicator or intraday level, I tried to play it. Here are the highlights from my efforts:
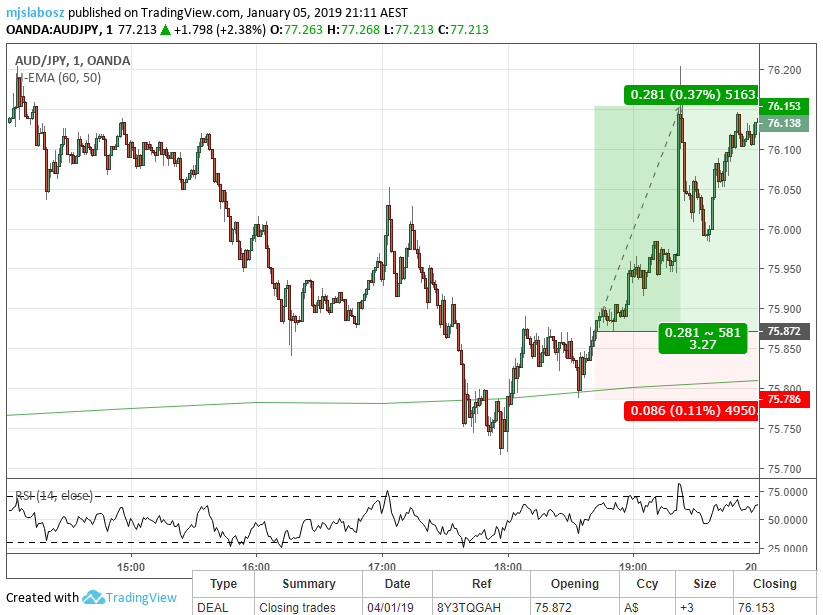
After price reclaimed the 74.800 low following a weak false breakdown within a bullish 15M flag pattern, I decided to go long with a tight stop and about 3% risk. I closed out too early when price ran up quicker than I’d anticipated as I didn’t want to give too much back.
Luckily, after closing out the first trade too early, I got a second chance to get onboard the train to 75. Here I put on another 3% of risk after a bullish test of the 5-minute and 1-minute 50EMAs in confluence. Easiest 11% gain I’ve ever made, although yet again I sold too soon.
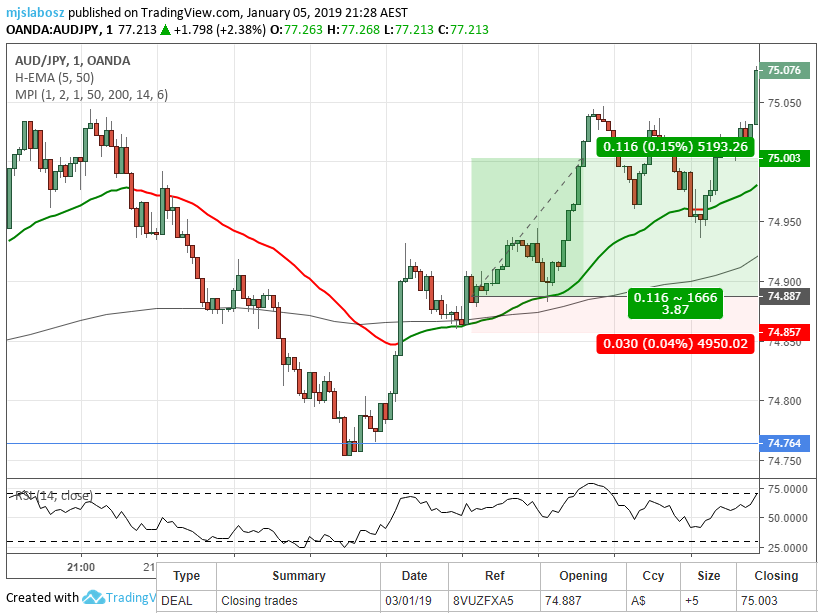
The next afternoon I got a chance to put on yet another 3% risk once a higher low formed on the 1-minute timeframe, following a test of the 1-Hour 50EMA. My target was at the previous close of the 1-Hour swing high which was hit without trouble.
Price then rocketed on to 77.00 after finding support at 76.00, making this the trade in which I missed out on the most profit potential. If I had just rolled my stop to break-even and gone to bed, I would’ve made a significant amount of money overnight.
But being over-cautious and tired, I took my reasonable but lesser profit off the table and called it quits for the week.
Fight For Price:
This is an element of good trading that I often struggle with, but considering I was trading the 1-minute timeframe mostly throughout these two days (only when price got to an interesting higher-timeframe zone), I think I did well to fight for well-priced entries.
But I could have done much better if I was more focused and prepared.
There were a few occasions where I bought break-outs too late or I missed them altogether, which I am disappointed with. As you can see in the above examples, I often sold too soon, and on the third trade I bought too late.
The point here is that fighting for price (for both your entry and your exit) is a key factor in how well you benefit from exploiting these types of opportunities.
On a 4HR chart you have more time to plan and think, but in the heat of the moment during a day-trading session, you must always be cautious not to enter too late. Exiting too early is forgivable if you covered your risk, but entering too late can burn you badly if you use a large position.
Throughout the entire ordeal, I was very conscious of the fact that a seasoned professional trader would’ve done much better than myself under these same circumstances.
But for a third-year retail trader who learned almost everything I know from books and online videos… I must admit, I did feel a small tinge of pride when I ended the week profitably.
Especially considering how poorly I was trading this time last year.
Conclusion
If you can manage these four Good Trade aspects, then you ought to be able to come away with many One Good Trades during a time like this.
Our job as traders is to make maximum profits with minimum loss. This trading opportunity, post-crash, presented a chance to make a lot of profit with very minimal risk, and I hope to do better next time something like this occurs.
Of course, if AUD had crashed and stayed crashed, this would be a very different post (since I am Australian).
But as it stands, it does indeed seem as though this was an algo-driven flash crash that was something of a mistake or accident which means the dramatically bearish price action was erroneous, and such events are rare.
We traders must take advantage of such events when they occur; but we must also guard carefully against becoming complacent and getting caught on the wrong side of them.
Sometimes we cannot avoid being struck by disaster. As with all things in life, it is in the nature of the game. But we can do our best by managing our risk properly with stop loss orders and defensive vigilance during highly volatile times.