Weekly Review #45
Table of Contents
Forex Trading Review – Week 45
This week was a huge confidence booster. I managed to capture some really nice moves out of the market while taking minimal losses, which is what long-term successful trading is all about.
During deep drawdowns (especially ones that come close to or exceed your Max Drawdown limit) it is normal to begin questioning yourself and second-guessing your trading decisions. During the past few months I have been quite uncomfortable trading through this drawdown because I know that if it gets too much worse, I might have to pull the plug on my current trading style and go back to the drawing board altogether.
But this week taught me yet another valuable lesson in my trading journey. Rather than change strategies altogether when this drawdown hit, I have been spending most of my time analyzing my stats for the year and re-backtesting adjustments to my strategy in an attempt to increase its efficacy.
As a result of a few relatively minor changes I have made to my trading rules, this past week I have felt much more comfortable with my trading process.
I no longer feel conflicted about the setups that I take. By accounting for higher-timeframe structure and price action, I feel like I am taking as many factors into account as I reasonably should in order to maximize the edge of my strategy.
This has renewed my confidence in my strategy and this week’s results is a promising sign to me that I have made the right decision. One of the trades this week netted an almost +5% gain with only 1% risk. All I need is 4 or 5 more trades like that to get out of my drawdown, which is really comforting to know and a big reminder of why it’s so important to manage your risk.
At the start of the year it seemed like I couldn’t make a wrong decision and winning trades came easily. But these past few months have been rough. You never know when the good times or the bad times are coming – so you must manage your risk throughout all times in your trading, good or bad, if you want to stand a good chance of surviving through the seasons.
This week I listened to an episode of Akil Stoke’s Trading Coach podcast where he interviewed Steve Burns, who is one of my personal role models as a trader and someone I hugely respect and look up to in the trading community and industry. It was a phenomenal episode and one that I found extremely motivational given the current state of my performance.
During the interview I learned that Steve once endured a 50% drawdown. Meaning that he lost half of his capital before eventually making a new equity high.
Obviously drawdowns like this are extremely rare among professional traders and there’s not a trader on earth who would feel comfortable during a situation like that. In fact, most people who get hit with a 50% drawdown rapidly spiral into a 100% drawdown – and blow their accounts due to ever-worsening decision-making as the stress and pressure builds.
But the major lesson from the story is that the way Steve managed to claw his way back to new equity highs was to simply stay disciplined and consistent to his trading rules (and make adjustments and improvements along the way).
He didn’t lose faith in himself or beat himself up too badly. He didn’t blame market manipulators or his broker or President Trump’s tweets. He didn’t look for someone on Instagram to confirm his self-perceived victim-hood so that he could remain in his psychological comfort zone.
Instead, he took total responsibility for his trading results, put his negative emotions and self-judgment aside as best he could and then continued the march forward with a clear focus on the objective goals that he knew would get him to where he wanted to go. He ignored all the noise and just kept putting one foot in front of the other.
He ran his tests, crunched his numbers and then continued executing his system faithfully. As he says in the interview:
If you do all the backtesting or your chart studies, or you understand your risk:reward ratio, you can still develop faith in what you’re doing before you see the results.
. . .
You know why you’re gonna win, what it’s gonna take, and the potential for drawdown and losses, so it really gives you the faith in your system if you don’t have the faith in yourself yet. You’ve just gotta have faith in yourself that you’re going to be disciplined enough to follow the process; that you can trust yourself not to lose discipline.
Steve Burns
If he can do it, then we can do it. And I know for a fact that he would agree.
4th November – 8th November
Trade #224
| Market | AUD/USD |
| Date & Time | 1/11/2019 3:00PM |
| Daily Cond. | Bullish TC Breakout |
| Timeframe | 4HR |
| Strategy | Pullback |
| Result | -1.00% |
| Verdict | Good Trade |
Before 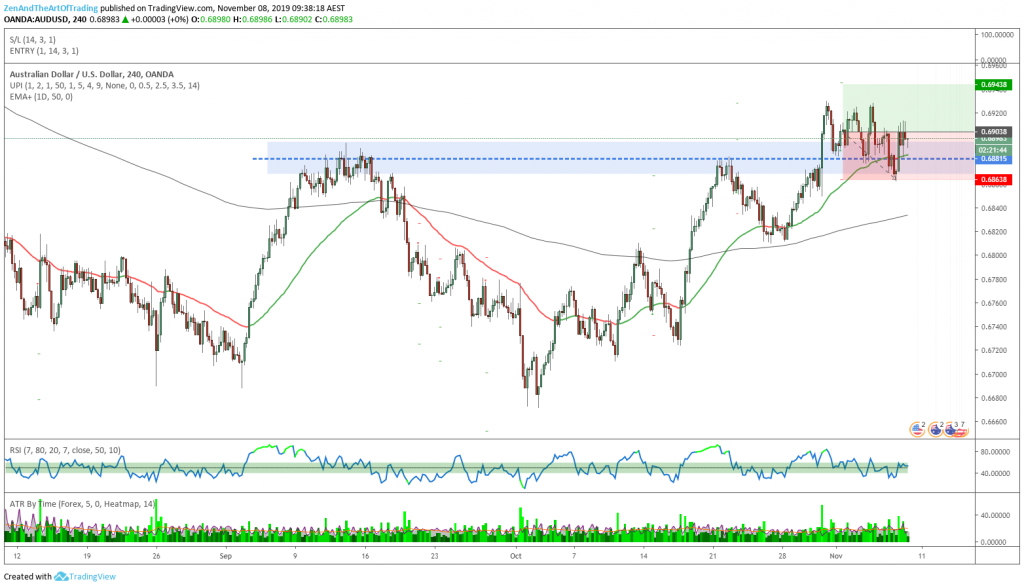
After
Reflection:
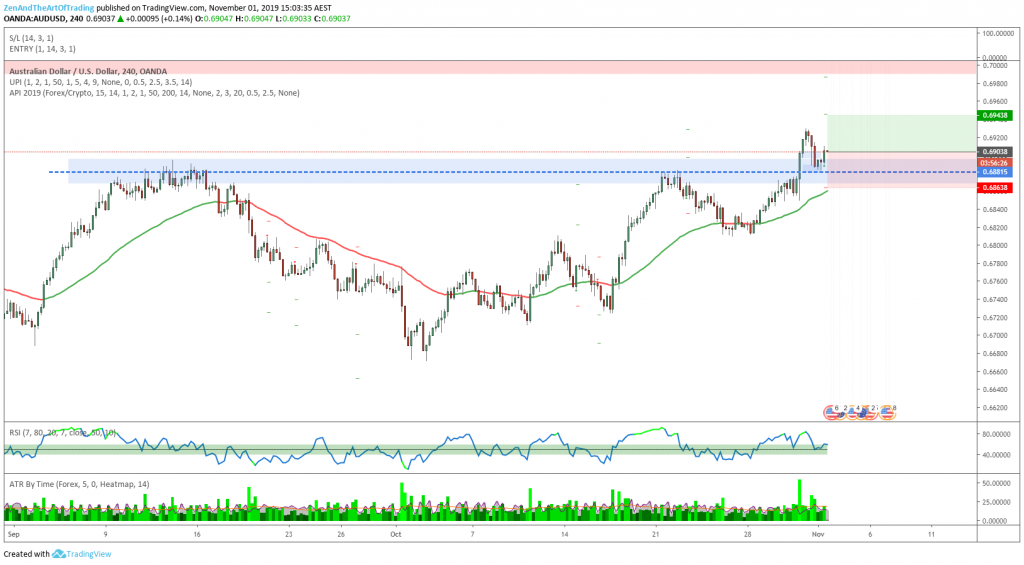
This was a trade from a week or two ago. It was a pretty solid setup with both the rules for the EAP pullback strategy AND the structure-based aggressive entry strategy met in confluence right within a 3X-OTZ (3-times-tested optimal-trade-zone: hence the abbreviation lol).
Normally I don’t trade the 4HR chart simply because this past year I have had a lot of spare time to focus on my trading and so I felt more productive trading faster-paced intraday timeframes.
But as I get busier with this website and building a YouTube channel and other things that I find enjoyment out of besides just placing and managing trades, I am more open to implementing 4HR strategies into my trading plan.
I have backtested this pair and found it to be profitable enough to feel comfortable trading it. And even though I haven’t finished optimizing my portfolio to include this pair, I still felt comfortable using discretion to take this trade given the many obvious factors of confluence supporting it.
In the end it lost as price began consolidating instead of continuing with the bullish momentum, but that’s ok with me. I only lost 1% of my capital and given the quality of this setup and the potential multiple-R:R reward it could have netted if it had played out as a profitable trade, I am perfectly fine with that.
Trade #226
| Market | EUR/USD |
| Date & Time | 5/11/2019 12:00PM |
| Daily Cond. | Double-Top @ Resistance |
| Timeframe | 1HR |
| Strategy | Pullback |
| Result | B/E |
| Verdict | Good Trade |
Before 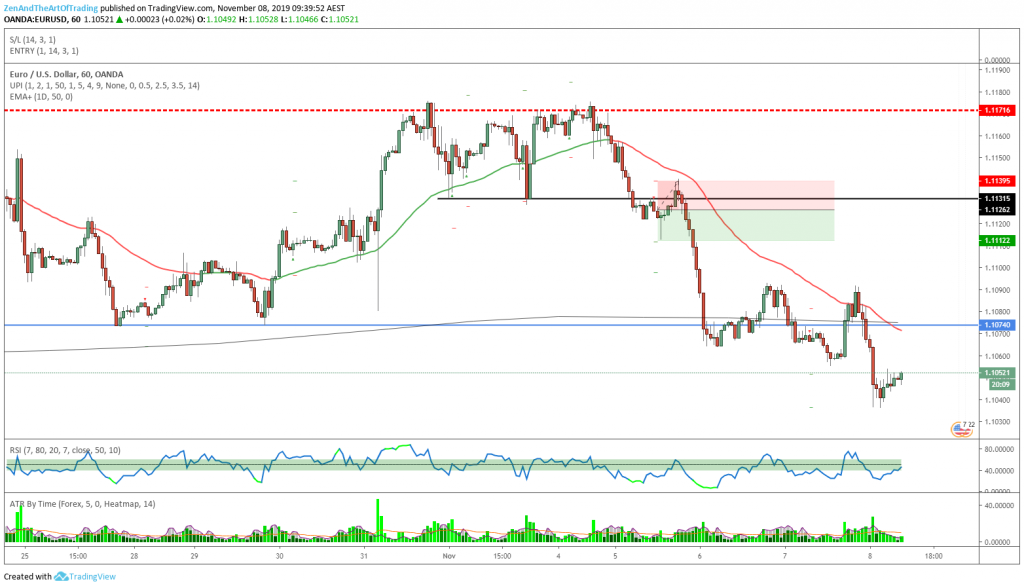
After
Reflection:
These trades are always fun. Talk about mixed feelings.
As you can see, price had just rejected off a major daily resistance zone. The 1-hour chart was in consolidation, and just before this pullback setup occurred price broke and closed below support of that consolidation.
Given the fact that this all happened below the 50-EMA, this indicated to me that momentum may be shifting to become bearish and we might see a potential trend-reversal from this zone.
That is exactly what we got. But not before price came within 1 pip of my stop loss, causing me to roll my stop to break-even, and then stopped me out on a retracement. So far, business as usual.
But then price then poked above my original stop loss price by a pip (which made me feel good that I avoided a loss), and then crashed many multiple R:Rs in favor of the original setup (which made me feel bad that I missed out on the big move).
These times can be confusing. It can be a roller-coaster of emotions which leaves you in the end feeling like you made the wrong decision. You entered a trade, you got the directional bias correct, but then because you either rolled your stop to break-even or kept your stop-loss where it was and got stopped out by a fraction of a pip, you missed out on actually profiting from the move that you correctly anticipated.
You might wonder if you shouldn’t roll your stops to break-even anymore, or that maybe you should have a slightly wider stop loss to begin with, or implement some other impulsive non-trivial adjustment to your trading rules without backtesting it first.
But my advice if you struggle with this is simple: just get used to it. Seriously. Train yourself to not care whenever this happens. Learn to treat this trade exactly the same as the hundreds of other trades you take per year, or the thousands of trades you’ll take in a lifetime.
Because let me tell you – it will happen A LOT, no matter what strategy or stop-loss rules you use, and the more you struggle against it, the worse it will get. If you find yourself in this situation as a new trader and you get the emotional pangs of “did I do the right thing here?” – just ask yourself:
Did you follow the rules of your backtested trading plan?
If so, move on. You did the right thing.
Trade #227
| Market | EUR/JPY |
| Date & Time | 6/11/19 8:30AM |
| Daily Cond. | Testing Resistance |
| Timeframe | 15M |
| Strategy | Pullback X |
| Result | +1.07% |
| Verdict | Good Trade |
Before 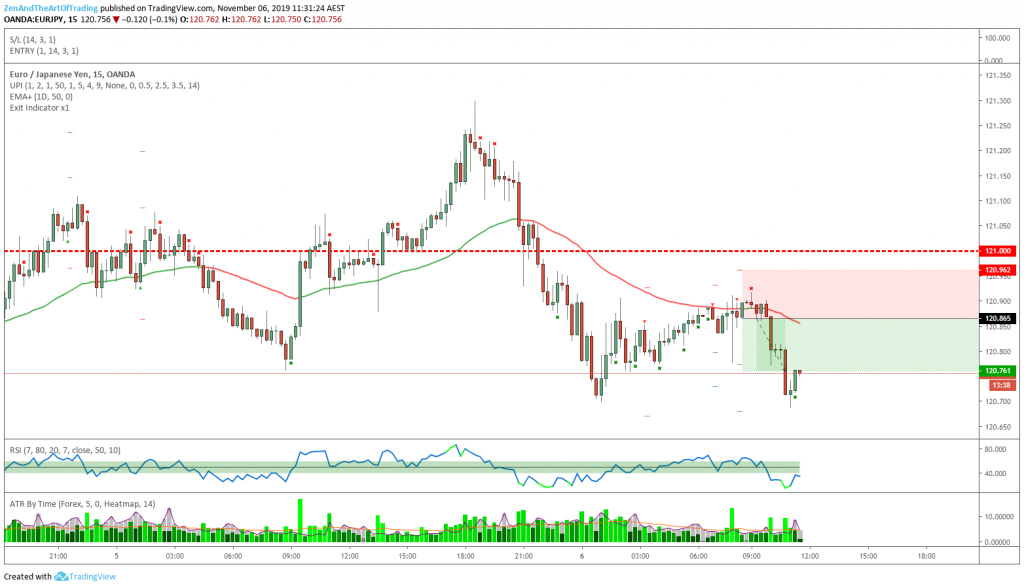
After
Reflection:
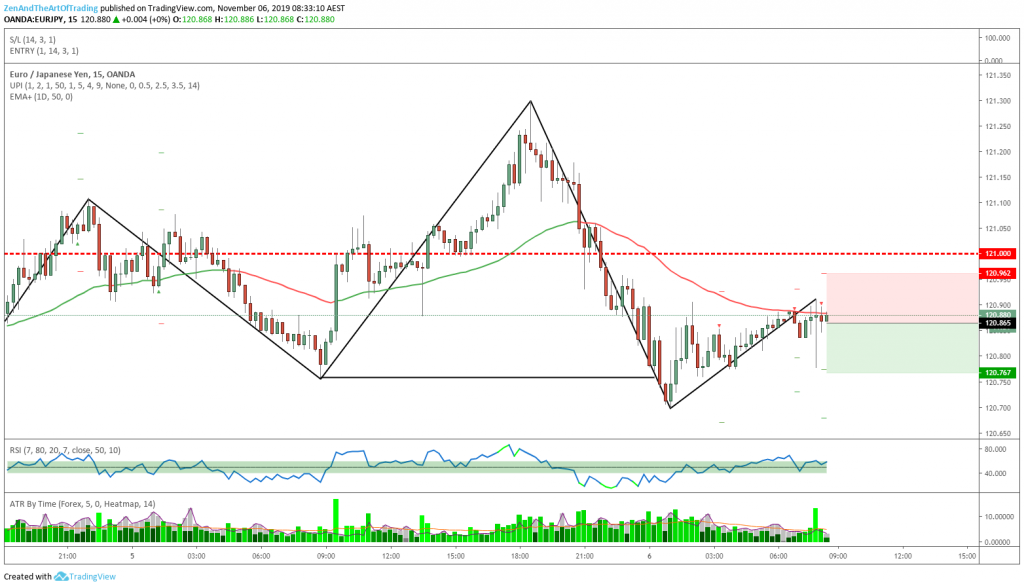
This was a small win on EUR/JPY. Price had just rejected off a major Daily resistance zone and then made a new low for the first time since this bullishly trending 15M timeframe move began.
Whenever this happens (below the 50-EMA), I typically have above a 50% chance of capturing a nice swing out of the markets. In this particular case I got my exit signal at the previous low, making it only a 1% winner or 1:1 winner.
But the most important thing is it was a Good Trade that met my trading rules and gives me an edge. That’s all that really matters. Sometimes they win small, sometimes they lose small, and sometimes they win big – and that’s what I’m waiting for!
Trade #228
| Market | EUR/JPY |
| Date & Time | 7/11/19 8:00AM |
| Daily Cond. | Testing Resistance |
| Timeframe | 15M |
| Strategy | Pullback X |
| Result | +4.49% |
| Verdict | Good Trade |
Before 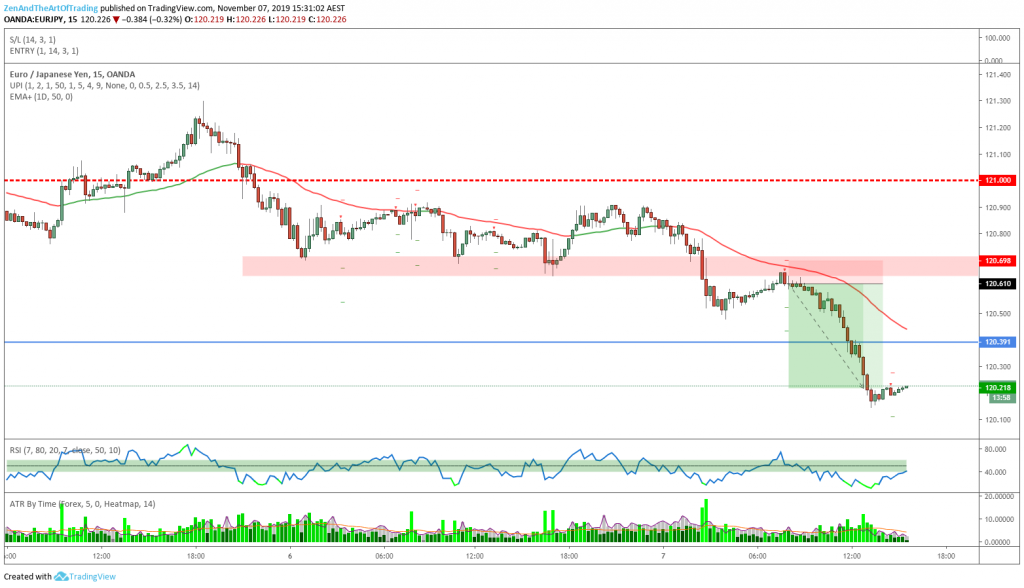
After
Reflection:
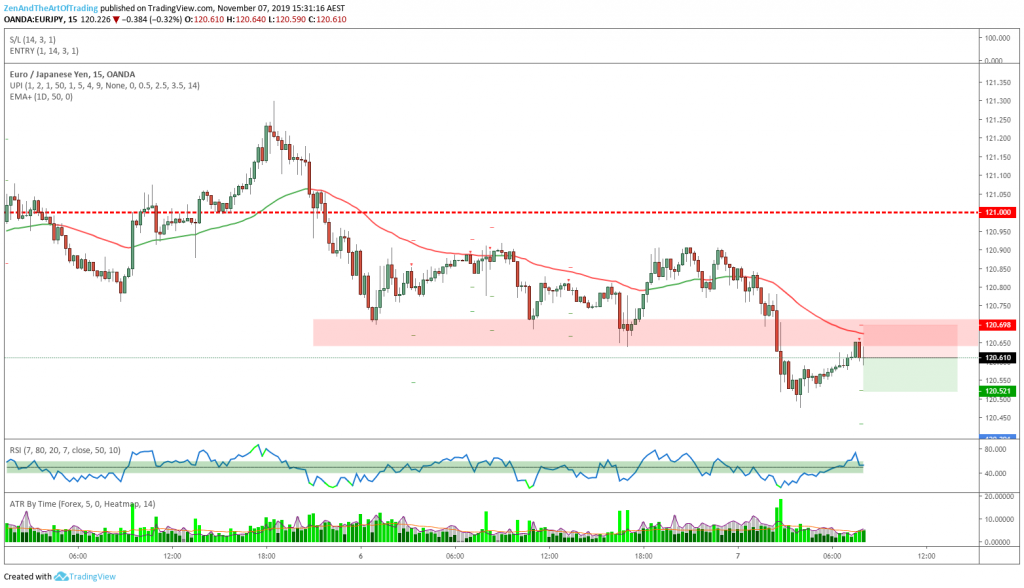
Finally, a decent winning trade on the 15-Minute Pullback X strategy!
I call it the Pullback X strategy because it essentially has the same rules as Steven Hart’s 4HR EAP Aggressive Pullback Strategy, but the rules have been tweaked to be simpler and more suited for intraday timeframes like the 15-Minute and 1-Hour chart.
Instead of two positions with split risk and a trailing stop, I use a single position equating to 1% of total risk. I don’t trail my stop loss, but I move it to break-even after price hits a 1:1RR from my entry. The reason for this is because the goal of this particular strategy is to capture momentum – not necessarily trends like you might see on the 4HR chart.
This trade here is exactly the type of trade I am trying to capture with this strategy.
As you can see – if I had stayed in this trade and tried to trail my stop loss or ride this down to previous major support instead of just trying to capture one single impulsive intraday leg out of the market, then the result of this trade could have been very different.
Instead, I just followed my trading strategy. And it was my strategy that got me in at the perfect price and then got me out at the perfect price. Managing this trade took me about 30 seconds in total. 20 seconds to place the trade and set my exit alert, 10 seconds to open up my phone app and close it when the exit alert went off.
Between those two times I did not check on the trade even once. In fact, I was busy attending appointments that day while this all played out and it wasn’t until my exit alert went off that I saw how much profit I was up on the trade.
The reason I’m saying all of this is to demonstrate the ridiculous value of a rules-based trading plan. It makes my personal trading almost stupidly simple, and best of all – it allows me to capture far more profits out of the markets than I would otherwise!
There is zero chance I would have been able to time my entry and exit this well using discretion alone. It was my objective rules-based trading strategy purpose-fit and designed to capture these types of moves that caught it for me – not my intuition or discretion.
There’s no need for hope or luck or gut feelings or even stress if you have a well-built trading plan that you can rely on and trust in without second-guessing it.
Intuition can be extremely valuable as you develop discretion as a trader. But for most traders, especially beginner traders, intuition is the enemy of consistency, which is in turn the enemy of progress. Because, as I’ve said many times – you can’t improve what you can’t measure!
So beware of depending on intuition for trading decisions, and only use discretion to overrule your trading plan when absolutely necessary.
Trade #229
| Market | EUR/USD |
| Date & Time | 8/11/19 11:00AM |
| Daily Cond. | Bearish Reversal |
| Timeframe | 1HR |
| Strategy | Pullback |
| Result | +0.50% |
| Verdict | Good Trade |
Before 
During
Reflection:
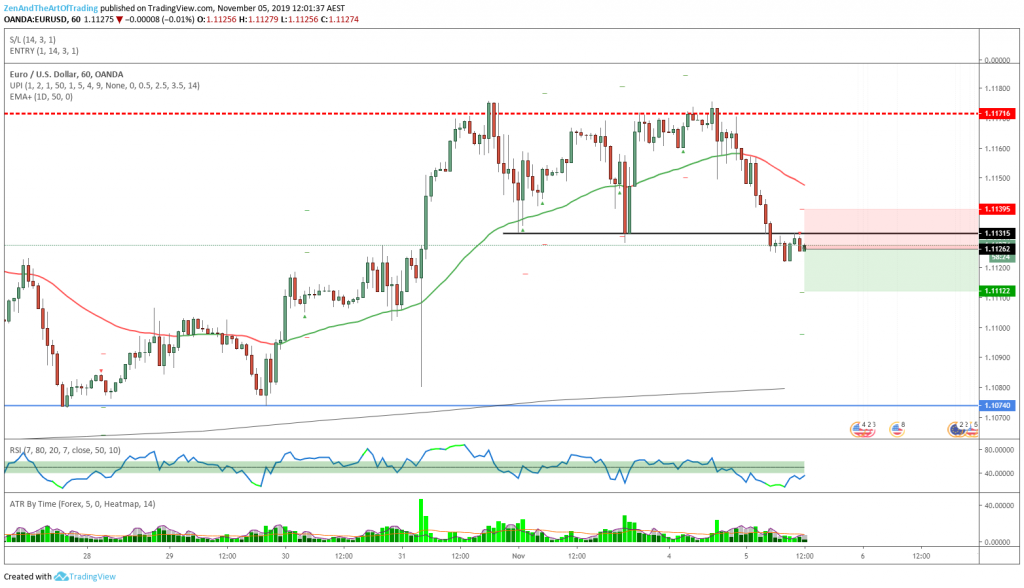
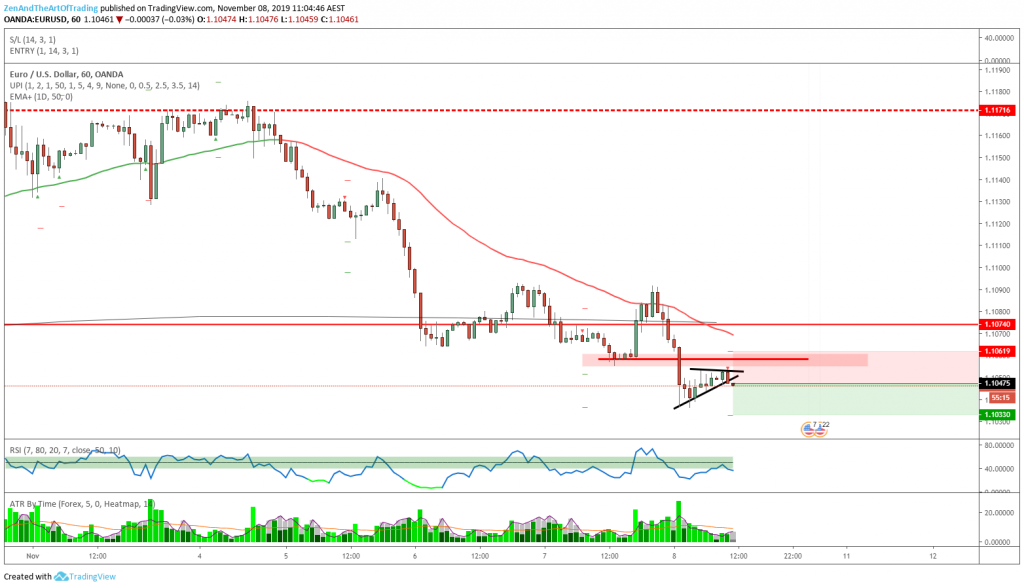
This setup was fairly obvious. Price is making lower lows and lower highs below the 50-EMA and had just rejected off a major Daily resistance level and then broke and closed through a major Daily support level.
When all this happened my bias on EUR/USD turned extremely bearish, and even though I feel like the majority of this move is over and we will probably see a deep bullish retracement soon on this timeframe, I was confident that the first target could be hit on this trade, so I went for it.
We’ll have to wait and see what happens this coming week as I am still involved in this trade with my second position (being a 1-Hour trade and a regular Pullback Strategy setup), but I think my chances of hitting multiple targets are decent. I’m still bearish on this pair moving forward this week until we tag the 1.10 zone.
Trade #230
| Market | AUD/JPY |
| Date & Time | 8/11/19 2:00PM |
| Daily Cond. | Testing Resistance |
| Timeframe | 1HR |
| Strategy | Pullback |
| Result | B/E |
| Verdict | Good Trade |
Before 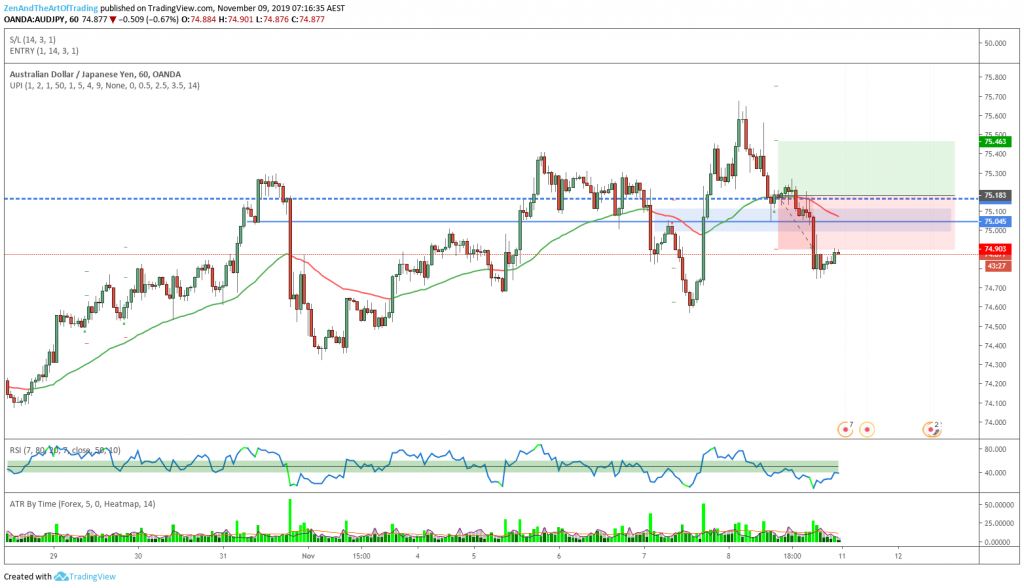
After
Reflection:
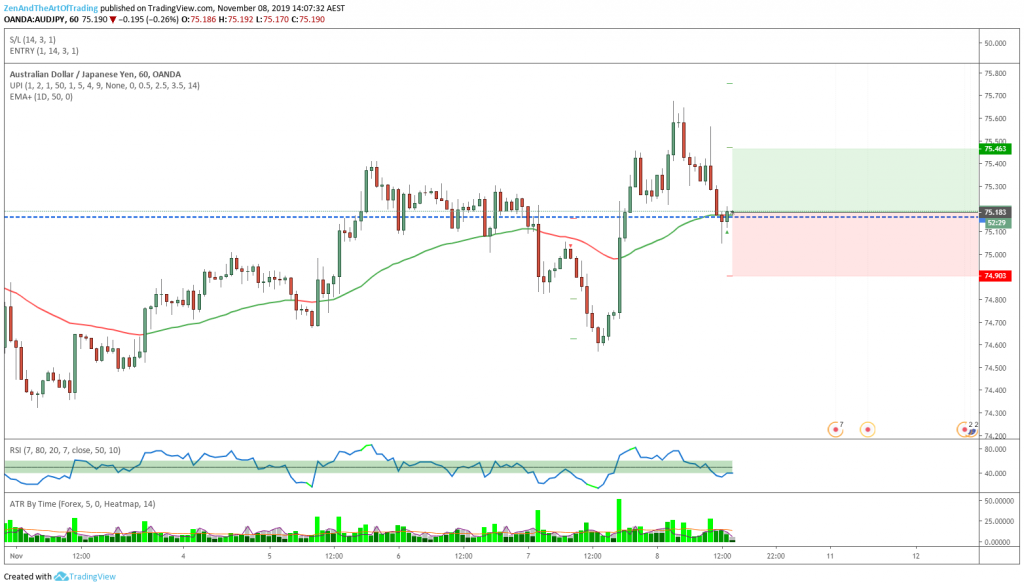
This was a potential trend-continuation trade after price had just broken and closed above this daily resistance zone with an impulsive move.
I did not like how fast price retraced after this breakout, as it often indicates a failed breakout and potential reversal on the higher timeframes.
Sure enough, late on Friday night (Australian time – which is morning time in the U.S.), I saw that price was still hovering around the 50-EMA and not looking very healthy for the bulls. So I made the discretionary decision to exit the trade for break-even when I got the chance just so that I didn’t have to worry about any price gaps over the weekend.
This turned out to be a wise decision as price did roll over throughout the rest of the U.S. session, so I avoided a loss here.
And in fact as of this morning (Monday 11th), Friday’s daily chart has closed as a bearish engulfing candle and the 1-hour chart has just put in a potential bearish reversal setup – so I’m now holding a short position on this pair.
Weekly Reflection
Annual Return: +3.89% | Drawdown: -19.21%
Last Week’s Goal: Backtest For At Least 2 Hours Per Day.
Overall Grade: A
This was a much better week than my past few weeks. Not just because I caught some winning trades (which is always nice!), but because I have further grounded myself as a trader and increased my confidence in my trading process even more.
Every month I feel tangibly closer to my goal of being not just a sustained consistently profitable trader, but a great trader who really takes his craft seriously. I have a looong way to go yet to get there (if I ever get there), but each journal entry like this where I learn pivotal things about my process makes me feel one large step closer.
This is the game. This is what we all signed up for when we became forex traders. Constant struggle, constant improvement, constant emotional ups and downs. It gets easier as you go, I can attest to that. But all that means is that you become more free to take on more challenges.
So the journey truly never ends if you don’t want it to. So long as you strive to become a better trader, there will always be exciting things for you to do and discover.
Good luck with your own journey, and I hope you found this entry valuable or at least learned something helpful out of it for your own trading or your own life.
I’ll see you next time. I hope you all have a great trading week, speak soon!
– Matt
Next Week’s Goal
Backtest For At Least 2 Hours Per Day.
Previous Week’s Review
This Week’s Review
Myfxbook Stats

